Welcome to the world of cuckoo clock repair! This comprehensive guide provides step-by-step instructions, detailed photos, and expert tips to help you restore your timepiece to perfect function.
1.1 Understanding the Basics of Cuckoo Clocks
Cuckoo clocks operate on mechanical movements, often made by brands like Regula, which are known for reliability. These timepieces are powered by weights and a pendulum, with features like music boxes and animated elements. Understanding the basics involves familiarizing yourself with components such as the movement, bellows, and strike train. The clock’s heartbeat is regulated by the pendulum’s swing, ensuring accurate timekeeping. Common issues include timing problems and sound malfunctions, which can often be resolved with proper adjustment or minor repairs. Grasping these fundamentals is essential for effective troubleshooting and maintenance, as outlined in detailed repair manuals and guides.
1.2 Importance of a Repair Manual
A repair manual is indispensable for cuckoo clock owners, offering detailed guidance for troubleshooting and maintenance. These manuals provide step-by-step instructions, diagrams, and photos to help identify and resolve common issues. They cover essential topics like movement identification, cleaning, and oiling, ensuring proper care. With a manual, owners can address problems confidently, from timing adjustments to sound mechanism repairs. Comprehensive guides, such as the 2023 edition, include over 100 pages of expert advice, making them invaluable for preserving the clock’s functionality and sentimental value. Whether tackling minor fixes or complex overhauls, a repair manual is a must-have resource for every cuckoo clock enthusiast.
Essential Tools and Materials for Cuckoo Clock Repair
Key tools include screwdrivers, pliers, and specialized clock repair instruments. Materials like oil, cleaning solutions, and replacement parts are crucial for maintaining and restoring functionality.

2.1 List of Necessary Tools
Essential tools for cuckoo clock repair include flathead and Phillips screwdrivers, needle-nose pliers, a jeweler’s loupe, and a soft-bristle brush for cleaning. A pendulum adjustment tool and a movement holder are also crucial. Additionally, oil specifically designed for clock mechanisms, such as synthetic clock oil, is necessary for lubrication. A pair of tweezers and a small hammer may be needed for delicate adjustments. For more intricate repairs, a set of precision screwdrivers and a movement cleaning solution can be helpful. These tools ensure proper disassembly, inspection, and reassembly of the clock’s mechanical components.
2.2 Recommended Materials for Maintenance
For cuckoo clock maintenance, use high-quality clock oil to lubricate gears and pivots, ensuring smooth operation. A soft, lint-free cloth is ideal for cleaning surfaces without scratching. Silicone-based sprays can protect metal parts from rust. Regularly inspect and replace worn components like bellows, weights, and pendulum parts. Keep a set of replacement screws and grommets on hand. Use a movement cleaning solution to remove old oil and grime. Store the clock in a dry, stable environment to prevent warping or rust. These materials help maintain the clock’s functionality and longevity, keeping it accurate and visually appealing for years to come.

Setting Up and Initial Checks
Unpack and hang the clock straight, ensuring the pendulum swings evenly. Check for proper alignment and secure all parts. Verify the cuckoo sound and music function.
3.1 Unpacking and Preparing the Clock
Begin by carefully unpacking the cuckoo clock, ensuring all components are intact. Remove any protective packaging materials, such as plastic or foam, from the clock and its parts. Inspect the clock for damage or bent wires, especially the pendulum and weights. Gently remove clips or security paper that may hold internal mechanisms in place during shipping. Check for loose parts, such as the bird or decorative elements, and ensure they are securely attached. Finally, verify that all accessories, like the pendulum and weights, are included and ready for installation. Proper preparation ensures a smooth setup process.
3.2 Proper Hanging Techniques
Properly hanging your cuckoo clock is essential for its accurate operation. Choose a sturdy wall and ensure the clock is hung at eye level for optimal viewing. Use a carpenter’s level to confirm the clock is perfectly horizontal. If the clock tilts, adjust the pendulum wire slightly to compensate. For clocks with a pendulum, ensure it swings evenly, with equal time for right and left movements. Avoid placing the clock near drafts or extreme temperatures. Secure the clock firmly to the wall to prevent swaying. Finally, double-check that all components, such as weights and the pendulum, are properly aligned and functioning smoothly.
3.3 Initial Checks for Proper Functioning
Before operating your cuckoo clock, perform a thorough initial check. Ensure all packaging materials are removed, especially from the cuckoo door and bellows. Verify that the pendulum swings evenly and the clock hands are properly aligned. Check for any obstructions that might prevent the cuckoo bird from moving or the music box from playing. Test the cuckoo sound by opening the bird door manually. Ensure the music box starts and stops correctly after the cuckoo call. Finally, monitor the clock’s timekeeping accuracy over 24 hours to identify any timing issues. Addressing these elements ensures smooth operation and prevents potential malfunctions.

Troubleshooting Common Issues
Identify timing issues by checking the pendulum’s swing and clock hands alignment. Fix the cuckoo sound mechanism if the bird is silent. Resolve music box malfunctions by adjusting levers or wires. Address clock hand adjustments to ensure proper timekeeping. Consult a professional if problems persist.
4.1 Identifying Timing Problems
Timing issues in cuckoo clocks often stem from an uneven pendulum swing. Listen for a consistent tick-tock rhythm, ensuring the pendulum swings equally left and right. If the heartbeat is irregular, adjust the clock’s position on the wall until the rhythm evens out. A slow or fast clock can be corrected by moving the pendulum bob up or down. For example, raising the bob speeds up the time, while lowering it slows it down. Regular checks and minor adjustments can prevent timing inaccuracies, ensuring your cuckoo clock keeps precise time. Always refer to your repair manual for specific guidance.
4.2 Fixing the Cuckoo Sound Mechanism
If your cuckoo clock’s sound is not working, start by ensuring all packaging materials are removed. Check the wire latch on the cuckoo door to ensure it’s free from obstructions. Open the clock’s back and remove any clips from the bellows, as these can muffle the sound. Also, verify that the security paper inside the gong wire has been discarded. Ensure the lift wire is properly positioned under the cuckoo bird. If the sound is weak, inspect the bellows for damage or dust. Use needle-nose pliers to adjust any bent wires affecting the bellows’ movement. Finally, ensure the shut-off switch is in the “off” position to allow the cuckoo sound to activate properly.
4.3 Resolving Music Box Malfunctions
If your cuckoo clock’s music box isn’t functioning properly, start by removing the back panel to access the mechanism. A common issue is the music not stopping after the cuckoo call, often caused by a bent brass lever. Use needle-nose pliers to adjust the lever so it fits securely into the hole, stopping the music. Another problem is the release on the brass lever being too large, preventing the music box from starting. Gently push the small white rubber stopper on the lever down slightly. Additionally, check for bent wires obstructing the fan fly, which can cause irregular sounds. Reposition the wire to avoid interference. If issues persist, ensure the double wire is securely attached to the arbor work and tighten if necessary.
4.4 Adjusting Clock Hands
If the clock hands are dangling or misaligned, adjustments are necessary. For the minute hand, loosen the hand nut with needle-nose pliers and reposition it to the correct time, ensuring it aligns with the 12 or 6 o’clock position for proper cuckoo timing. For the hour hand, loosen its nut, reposition it to match the correct hour, and gently push it toward the dial to secure it. Ensure both hands are synchronized to avoid binding. If adjustments are challenging, consider consulting a professional. Proper alignment ensures accurate timekeeping and smooth operation of your cuckoo clock.
Step-by-Step Repair Process
Follow a detailed guide to disassemble, clean, inspect, and reassemble your cuckoo clock. Methodical steps ensure proper restoration, maintaining its mechanical integrity and functionality for years to come.
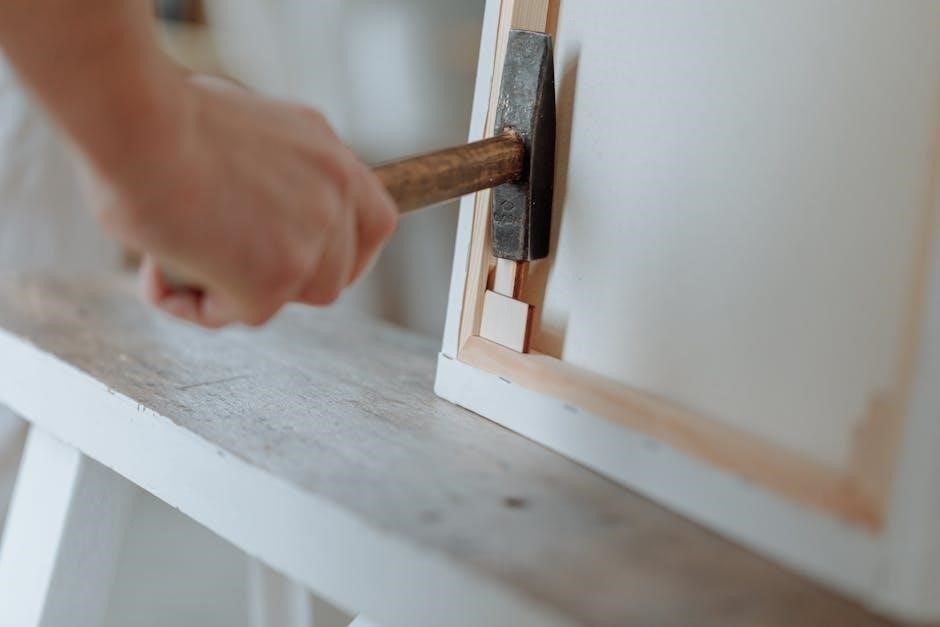
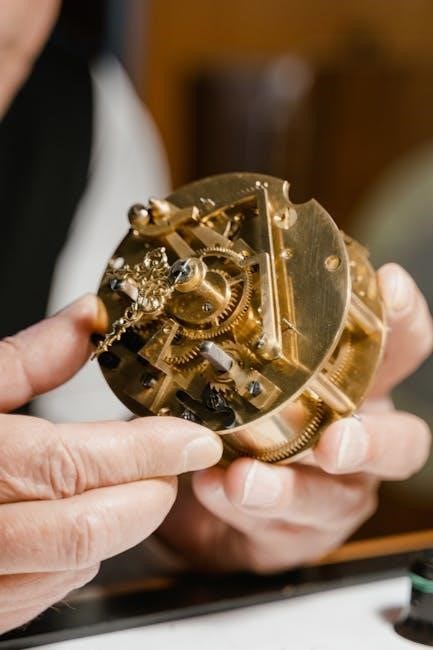
5.1 Disassembling the Clock
Begin by removing the weights and pendulum to access the clock’s internal mechanisms. Gently take off the back panel using a screwdriver to expose the movement. Carefully disconnect the bellows and wires connected to the cuckoo bird. Document each step to ensure proper reassembly. Use specialized tools to remove gears and components without causing damage. Handle fragile parts like the escapement and balance spring with precision. Store disassembled pieces in a safe, organized manner to prevent loss or misplacement. This systematic approach ensures a thorough inspection and prepares the clock for effective repair and maintenance.
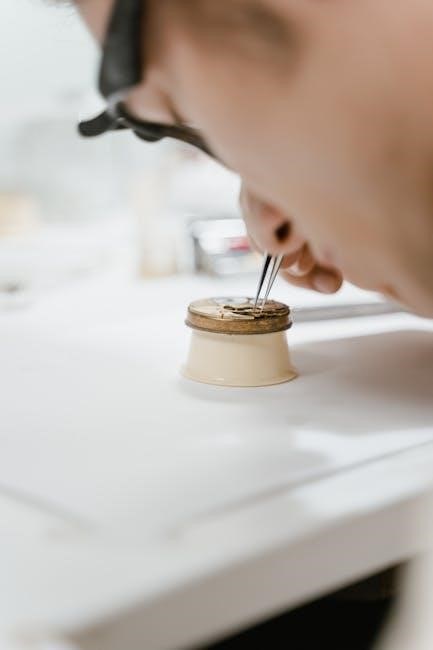
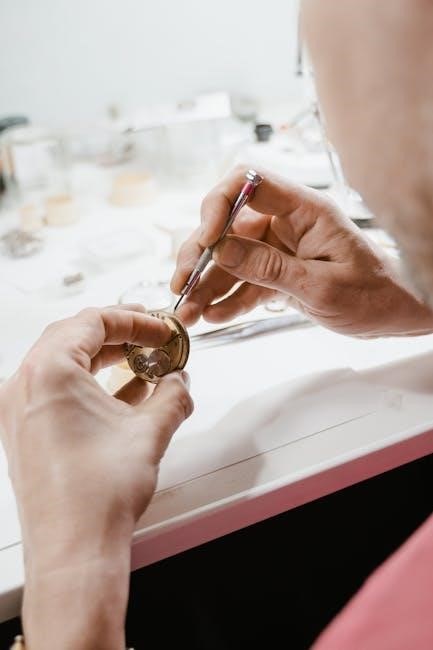
5.2 Cleaning and Inspecting Components
Clean each component gently using a soft-bristle brush to remove dust and debris. Avoid harsh chemicals, as they may damage finishes or harm internal mechanisms. Inspect gears, springs, and pivot points for wear, corrosion, or damage. Use a magnifying glass or jeweler’s loupe to examine intricate parts. Lubricate pivot points with high-quality clock oil to ensure smooth operation. Check the bellows for blockages and ensure the cuckoo bird’s lift wire is unobstructed. Replace any worn or broken parts immediately to prevent further damage. Proper cleaning and inspection are crucial for identifying issues early and ensuring the clock runs accurately and reliably after repair.
5.3 Replacing or Repairing Damaged Parts
Once damaged components are identified, replace or repair them carefully. For bent parts like the pendulum wire, use needle-nose pliers to straighten them. Replace worn gears or broken springs with genuine replacements. If the cuckoo bird’s lift wire is damaged, install a new one, ensuring it moves freely. For bellows, check for holes or tears and replace them if necessary. Lubricate any moving parts with clock oil after repairs. Test each component’s function before reassembling the clock. Ensure the music box and cuckoo sound mechanisms are aligned and operational. Proper replacement and repair of damaged parts are essential for restoring your clock’s accurate timekeeping and charming features.
5.4 Reassembling the Clock

Reassembling the cuckoo clock requires precision and care. Start by reinstalling the pendulum and ensuring it swings evenly. Attach the weights securely, making sure they are aligned properly. Reconnect the music box and bellows, ensuring all wires and levers are correctly positioned. Reattach the clock hands, double-checking their alignment. Finally, reassemble the clock’s exterior, ensuring all decorative elements are securely fastened. Test the clock’s functionality, verifying the cuckoo sound, music, and timekeeping accuracy. Refer to diagrams or step-by-step guides for clarity. Once reassembled, hang the clock level and allow it to run for 24 hours to ensure proper operation. This step completes the repair process.
Maintenance and Prevention
Regular cleaning and proper oiling are essential for longevity. Store the clock in a dry, cool place to prevent damage. Always follow the manufacturer’s care instructions.
6.1 Regular Cleaning Schedule
Regular cleaning is crucial for maintaining your cuckoo clock’s functionality and appearance. Dust the exterior and mechanical parts every 3-6 months using a soft, dry cloth. For deeper cleaning, gently remove dust from intricate carvings and components with a small, soft-bristled brush. Avoid harsh chemicals or abrasive materials that could damage finishes or harm internal mechanisms. For clocks with painted or varnished surfaces, a slightly damp cloth can be used, but ensure the clock is completely dry afterward. Polishing metal components periodically with a mild metal polish can restore their shine. Always clean the clock when it is wound down to prevent damage to moving parts.
6.2 Proper Oiling Techniques
Proper oiling is essential to maintain the smooth operation of your cuckoo clock. Use a high-quality clock oil specifically designed for mechanical timepieces. Apply a small drop to pivot points, gear bearings, and escapement components. Avoid over-oiling, as excess oil can attract dust and cause damage. Oil should be applied every 1-2 years, depending on usage. Gently place the oil using a small oiler or a clean cotton swab. Never use household oils, as they can degrade the clock’s internal mechanisms. After oiling, allow the clock to run for a few hours to ensure the oil distributes evenly. Proper lubrication will extend the life of your clock and maintain its accuracy.
6.3 Storage Tips for Longevity
Proper storage is crucial to maintain your cuckoo clock’s condition and longevity. Before storing, ensure the clock is clean and free from dust. Use a soft, dry cloth to wipe down all surfaces. Store the clock in a protective case or wrap it in a breathable fabric to prevent scratches and moisture exposure. Keep it in a cool, dry place away from direct sunlight and extreme temperatures. Avoid storing the clock in attics or basements with high humidity. If the clock is not in use for an extended period, wind it down completely to relieve tension on the springs. Handle the clock with care to avoid accidental damage. By following these storage tips, you can preserve your cuckoo clock’s functionality and aesthetic appeal for years to come.

When to Seek Professional Help
Consult a professional if complex issues arise, such as bent pendulum wires or internal mechanical damage, requiring specialized tools and expertise beyond basic DIY repair techniques.
7.1 Recognizing Complex Issues
Identifying when a cuckoo clock problem requires professional attention is crucial. Complex issues include severely bent pendulum wires, internal mechanical damage, or malfunctioning music boxes. These problems often involve intricate components like the Regula movement or Swiss-made music boxes, which demand specialized tools and expertise. If DIY adjustments fail to resolve timing inaccuracies, unusual noises, or complete stoppage, it’s time to seek help. Additionally, if parts like bellows, weights, or gears are damaged, professional intervention is necessary to ensure proper restoration without further damage. Recognizing these signs early can prevent minor issues from escalating into major repairs.
7.2 Finding a Qualified Repair Service
Locating a skilled cuckoo clock repair service is essential for complex issues. Look for certified professionals, such as those from the House of Black Forest Clocks or Bavarian Clockworks, who specialize in traditional German clockwork. Ensure the service has experience with movements like Regula or Hubert Herr. Check for certifications, such as being a Certified Black Forest Clock Repair Shop, to guarantee expertise. Contacting them via email or fax, as mentioned in repair manuals, can provide personalized solutions. A reputable service will diagnose issues accurately and offer detailed repair plans, ensuring your clock is restored to its original charm and functionality.
Conclusion
Mastering cuckoo clock repair requires patience and practice. With this comprehensive guide, you’ll restore your timepiece to its former glory, ensuring it ticks perfectly for years to come.
8.1 Final Tips for Successful Repair
For a successful cuckoo clock repair, patience and attention to detail are key. Always refer to a comprehensive repair manual for guidance. Inspect each component thoroughly, ensuring no parts are bent or obstructed. Regularly clean and oil the movement to maintain smooth operation. When adjusting the pendulum, make small changes and test the clock’s accuracy over time. If the cuckoo sound is weak, check the bellows for proper function. After repairs, allow the clock to run for 24 hours to ensure stability. For complex issues, consider consulting a professional or utilizing online resources like repair videos. Happy repairing!
8.2 Encouragement for Further Learning
Embrace the journey of cuckoo clock repair as a rewarding hobby and skill. With practice, you’ll master the intricacies of these timeless timepieces. Explore detailed manuals, videos, and online forums to deepen your knowledge. Learning about different movements, such as Regula or Hubert Herr, can enhance your repair skills. Join clock enthusiast communities for tips and inspiration. Remember, every repair is an opportunity to refine your techniques and appreciate the craftsmanship behind these clocks. Keep experimenting, stay curious, and enjoy the satisfaction of restoring a treasured timepiece to its former glory. Happy learning and repairing!